- Recipes Home
- Build A Smoker
- Barrel Smoker Plans
Free Barrel Smoker Plans
If you've got a barrel then with these barrel smoker plans you can have the shell of your smoker prepared in a matter of hours.
Some barrel smokers are getting on for £1,000 to buy and so I thought that there must be a cheaper way....and there is! That said, since researching and cooking on barrels I've found a low cost solution that knocks everything else into a cocked hat, more on that later. The construction process is simple and the design is crude so I think a set of barrel smoker plans is a little over the top because there really isn't anything to measure. It's more about the process and the steps involved so the series of photos that I've put together on this page with the links to the method statement and the tools required that will guide you through.
After a little thought, the construction only took me 3 hours and I only used a very primitive set of tools, so if I can do it, you can too!
Essentially what I've done is taken out the bottom of the barrel and raised it onto some bricks. In-between the bricks is my gas burner with old frying pan (to put the wood chips in) and that's the externals covered. Next I drilled some holes in the side to that I could attach some bolts to support the cooking grates and water bath. The chimney is the lid of the barrel with a wedge of wood so that I can vary the aperture - simple but effective.
The first section of the barrel smoker plans for you to read is the basic smoker design. Here I'll describe in words and pictures how the design fits together.
You can fuel a barrel smoker by charcoal or gas. I've chosen gas, arguably a little more expensive to set up but I believe that the final design makes hot smoking a really easy task. Click here to read my reasoning for gas.
You shouldn't need to pay for your barrel. Here's some ideas where to commandeer one free of charge.
In addition to the barrel there are a couple of items that you will will need to buy so I've listed the full bill of materials.
And finally, when you've got all your tools and equipment together, here's the method statement.
The design in my 55 gallon homemade barrel smoker plans is quite simple. Consider the basic construction of a bullet smoker from bottom to top:
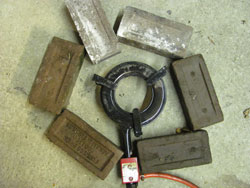
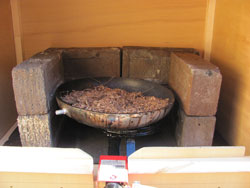
So in terms of how that translates into this barrel smoker design: I made a hole in the bottom of the barrel for my burner by cutting out a circle. I could have completely removed the bottom but I didn't because leaving the base partially in place maintains the structure of the barrel but most importantly the remaining part of the base provides a larger margin of error for placing the barrel on the bricks. If I had removed the base then the barrel would sit on the bricks with too much opportunity for the burner to be blown out by the wind.
You can see from the picture how I place the bricks and burner under the barrel. Nothing special, just so that it creates an approximate circle to act as a wind break. Note that I have place the bricks frog side down.
The burner is a paella pan burner. It's not powerful but it does the job. A paella pan burner is ideal because they are designed for outdoor cooking and have a long neck that makes for the control valve positioning an easy situation.
For the water bath, I bought a cheap oven roasting tin that was relatively deep (3 inches).
In addition to the burner, all that's required is a propane regulator & length of pressurized pipe, an LPG propane tank and an old frying pan.
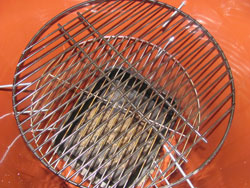
The drum size that I've used for my barrel smoker plans is 22 inches in diameter so in order to create a cooking grate and level for the water bath I made 2 x 18" circular cooking grates and each grate is supported by 3 x 4 inch bolts. I used three bolts because that ensures that the grate doesn't wobble and also it makes the grates easy to slide into position from the top of the barrel.
To create smoke, just place the frying pan on the burner and and put “slices” of hard wood in the frying pan (just remember to bark it first if using birch).
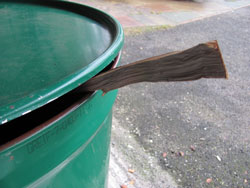
Don't forget to use a wedge of wood to open the lid of the barrel partially in order to create the through draft.
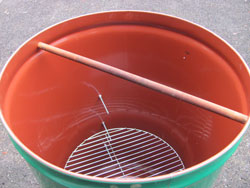
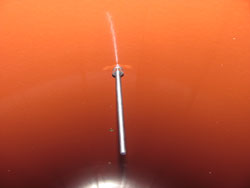
Note:- In the picture above you can see that I've inserted a length of dowel across the diameter of the barrel just below the lip. It's secured by a screw drilled through the wall of the barrel and into the end of the dowel. It's not there for structural support although it clearly helps, it's there for hanging fish and all you need to finish the job is a few S hooks. Fuel Choice
These 55 gallon barrel smoker plans are designed for use with a gas burner. It might not be the purists choice and it will make the construction a little more expensive but I chose to use gas because it's clean and easy. Part of this is driven by the physics of heating the two options. For
example, with a charcoal fire you use a top draft and bottom vent to
flow the smoke, support combustion and so increase temperature. Open the
drafts for more air and so more fire and more heat. The top vent is easy to control with a wedge of wood but if I were using charcoal. If I wanted to adapt these barrel smoker plans for charcoal: That said, I wouldn't need the frying pan...just throw the wood chips onto the burning charcoal. In summary if you want to use charcoal my barrel smoker plans adapt to a slightly different design and operating method. More heat = top and bottom vent open and
restricting air to reduce heat. It's an art form to get the balance
right and you could spend hours making fine adjustments to the air
supply.
Using gas is different, controlling the heat is by either tweaking up
the burner or closing the top vent (not completely). The top is still
required to “pull through” air but it works in a different way in that
the larger the opening, the more heat escapes and so the temperature in
the smoke chamber can be reduce.
Gas = more heat by increasing the burner strength and restricting the
top vent (but not eliminating it). Cool by opening the top vent and
turning the burner down. Much more instantaneous and so really easy to
control.
Flavour-wise there's little difference, the only significant point to make is that gas is less likely to give you a big pink smoke ring because the wood chips don't burn at such a high temperature. On top of the burner is an old frying pan and it's in here that I put the wood chips. The photo above shows the concept albeit this is in a different homemade smoker unit.
Where To Get Your 55 Gallon Barrel
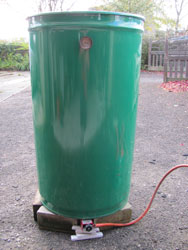
The Basic Design Concept For My Barrel Smoker Plans
Follow these drum / barrel smoker plans and you won't have to spend a lot of money but to make a 55 gallon barrel smoker you need to find a barrel. Pretty obvious huh? Well yes, but I've seen and heard about folks paying for a barrel and to be fair you can pay if you want a new one but to keep costs down I've found a great alternative.
My 55 gallon barrel smoker has been constructed from an agricultural feed drum that I got free of charge from an agricultural contractor who maintains milking machines. They have to pay to throw them away so he was more than happy to donate one to me so before you go parting with your hard earned cash do a little research in your local area and you'll probably be able to find someone who will be glad to give a barrel away.
Like mine, the barrel will probably have a protective paint on the inside. I had some concern about whether this would give off any nasty fumes when warmed up. Once I'd formed the basic design however I tested it and I'm happy to report no problems. The point here is that the design I've used is with a gas burner and the base cut out therefore no part of the barrel comes into contact with coals or a naked flame.
That said, it's still important to season the barrel and get some smoke running through it because it all adds to the flavour.
I chose to use gas to fuel my smoker and to be fair if you choose to use charcoal there may be some issues with the internal coating of the barrel. Having said that, once the coating has burned off, that's it, it has gone, so there may just be a need to do a "burnout" before using your barrel in anger.
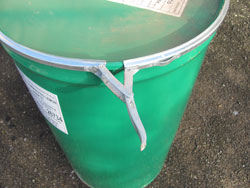
The barrel has a lid which is secured to the main body of the cylinder by a metal band but this really serves no other purpose for the smoker other than to keep thinks neat and tidy when not in use.
The Bill Of Materials
The list of equipment and tools needed to make 55 gallon barrel smokers isn't long and for convenience I've laid it all out here.
Wherever possible I've put links to Amazon.com for each tool then you can see a picture of what I'm talking about. Whether you choose to buy from Amazon or use your local hardware store is of course your decision but every time you purchase using these links we get a small commission which contributes to the running of this site and my business as a whole. At the same time it makes no difference to the price you pay.
Use this link to deck out your barrel smoker with rust proof stainless steel cooking grates.
Tools
- Center Punch
- Electric Drill
- Drill Bit - use the appropriate size for the bolts that you have purchased.
- Hammer
- Tin Snips
Materials
- 2 x screws (to secure the dowel)
- 9 x 4 inch bolts (3 for each level)
- 1 x Dowel Rod Hardwood 3/4" x 36"
Fixtures and fittings
- 1 x Smoker thermometer
- 1 x Large 3" deep roasting pan - for the water bath.
- 2 x 18½" circular cooking grates - these are cheap chrome plated grates that are fit for purpose. Use this link for rust proof stainless steel cooking grates
- Half a dozen S Hooks for hanging fish
- 1 x Paella burner
- 1 x Low Pressure Propane Hook Up Kit With 10-Foot Hose
- 1 x Propane Gas Tank
Method
It took just 3 hours to convert my barrel smoker plans into the finished article and here's how I did it.
Take a center punch and hammer to mark out where to make your drill holes in the base, this should form a circle approximately 4 inches in from the perimeter. With an electric drill (and the largest drill bit you have), make a hole where each center punch mark was. This leaves you with a circle of drill holes on the bottom of the barrel.
Using tin snips or wire cutters, cut out the metal between each hole to create on large hole. Remember the edge will be sharp so use gloves and when complete, dull down the edges with a hammer (it's crude but it does the job).
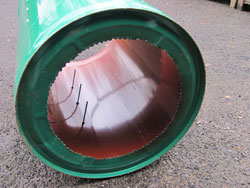
Decide at what height from the top you want the water bath and the cooking grate. My criteria were to ensure that there was enough room above the cooking crate for a vertical roasted chicken on a large turkey and the water bath to be 6 inches below that. For extra flexibility I also put in another shelf support, so my shelves were positioned at distances of 13”, 19” and 25” from the top.
At these distances mark three points at approximately thirds around the barrel with a center punch and drill holes. Insert 4 inch bolts and secure on the inside with a washer and nut.
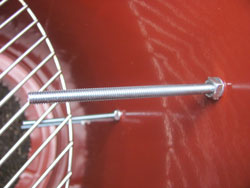
One inch below the top drill another couple of holes at opposite sides of the barrel. Measure the internal diameter of your barrel and cut a length of ¾ inch dowel to suit.
Screw the dowel into position and you've just made the perfect rail for hanging S hooks when smoking fish or duck (or indeed just for drying following brining).
The final hole you need to drill is for the thermometer. Position this about 6 inches below the top.
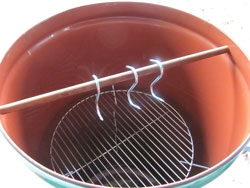 A rod for hanging fish completes the barrel smoker plans
What about the top vent or chimney? Quite simply place the lid on the smoker leaving a small gap (I use a small piece of wood) and it's as simple as that.
As I stated at the top, the conversion of these 55 gallon barrel smoker plans to having the smoker ready to go was about 3 hours and I have to say that despite the crude nature of the build the control-ability and functionality of this smoke unit is absolutely superb.
You can hot smoke to your hearts content and with a little extra “tweaking” (keep the burner low, wide opening on the lid and sawdust in the frying pan, you also can experiment with cold smoking.
Barrel Smoker Plans Too Much?
There's something satisfying about creating your own barrel smoker and there's something else about using it too. That said, having cooked on a number of barrels including my own I've found myself having the most fun and getting consistently good results using a Pit Barrel Cooker. I've had so much fun since getting the Pit Barrel Junior that my homemade barrel smoker rarely sees the light of day.
See Also:-
Build A Brick BBQ
Build Your Own Smoker
Pit Barrel Cooker
Ultimate Drum Smoker
Smoked Fish Recipes
Smoked Meat Recipes
External Links:-


