Build A Brick BBQ Grill
With Stainless Steel Inserts
Always wanted to build a brick BBQ grill in your back garden?
Maybe you’ve moved house and found a brick structure but the important bits
have rusted away. Your solution is right here.
Prices:
Small (610mm x 400mm) - £199.00
Medium (915mm x 400mm)- £299.00
Large (1220mm x 400mm) - £399.00
Extra Large (1220 x 600mm) - £599.00
Delivery
Products are made to order. As soon as we receive your payment we get to work and make your stainless steel grill inserts, they are then packed up and shipped using Parcelforce 48 hour delivery service.
Standard delivery costs for UK mainland shipping are included in the above prices. For an accurate quotation please contact Michael directly using the rapid response form below.
Once you've made your purchase please refer to my guide how to build a brick BBQ grill.
Your Stainless Steel Grill Kit Includes:-
Your stainless steel charcoal grill contains everything you need to build a brick BBQ excepting the bricks and mortar:-
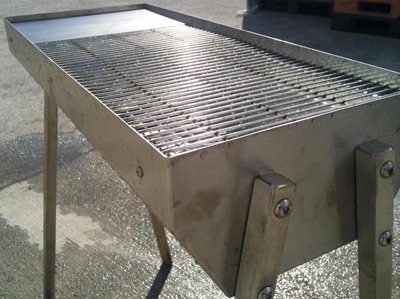
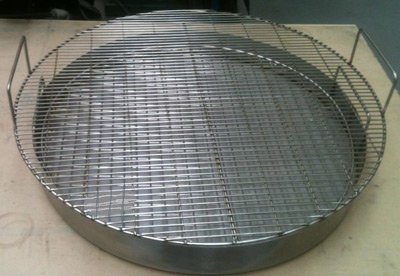
- A stainless steel base pan holed at one side to allow rain water to empty
- A removable solid stainless steel tray in which to place your charcoal. It’s important that this is solid, many other BBQ manufacturers use a mesh charcoal grate and this doesn’t work in an open charcoal grill because too much air gets underneath the coals, they burn too quickly and you have much greater chance of unwanted flare ups.
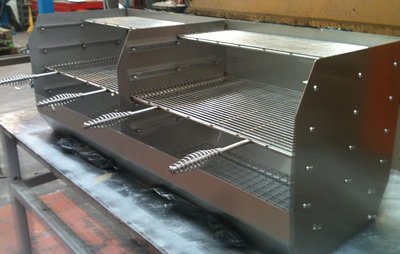
- A stainless steel cooking grate and two stainless steel hook on handles so you can easily adjust the height of your cooking grate dependent on the heat intensity of your coals.
- 8 stainless steel pins (10mm diameter x 100mm long), 4 to support the base pan and 4 to provide support for the cooking grate. Drill holes into the brick at the desired level and insert the pins. Additional pins will provide a fine tuned height adjustment for the cooking grate rather than those brick barbecues where the height adjustment is governed by intervals of brick height
Your new stainless steel charcoal grill inserts will last as long almost as the bricks it takes to build the surround because they are made of catering standard type 304g stainless steel and they are hand made in the UK. All stainless steel is not the same, this is why our stainless steel charcoal grills cost more…and why you don’t have to replace them every season. To learn more, read my guide to the different types of stainless steel.
The simple construction manual below will help you renovate or build a brick BBQ that will last. Moreover, it will look good (and your food will smell and taste good) year in year out no matter what the weather because in addition to our guide we also make the stainless steel charcoal grill inserts.
You don’t need to spend money on plans, you can build a brick BBQ grill by mocking up the foundation using our standard sized stainless steel charcoal grills as your template. There’s more about how to map out the brick-laying in our step by step guide below. If you already have the brick construction in your garden, just measure out the length and width of grill inserts that you need, buy the stainless steel grill inserts from our range and you pretty much set but don’t worry if our standard sizes don’t fit, we can custom make your new stainless steel charcoal grill to any size and pro rata the cost.
Note - It’s important to buy your stainless steel grill inserts before you start construction because you’ll need to use these as a guide to work out the placement of the bricks. Likewise if you want walls thicker than one course of bricks, plan it now so that you prepare the appropriate surface area of level ground (see step 2).
Step By Step Guide To Build A Brick BBG Grill
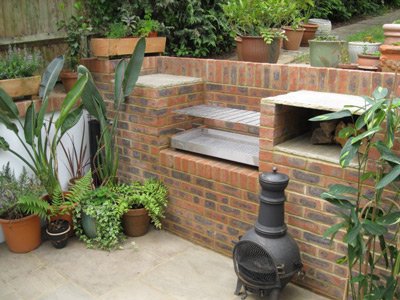
This guide will help you build a brick BBQ grill similar to this:
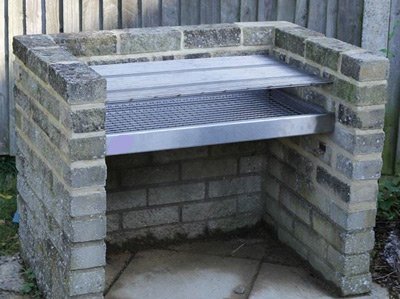
The brick work is basic. It's then up to you how you wish to elaborate.
1. The Practicalities
Start by thinking about the practicalities of your cooking space. Do you want an area to hold the raw food prior to cooking? How about an area to land things once they are cooked?
2. Where To Site Your Brick BBQ Grill
Factors to consider include proximity to your indoor kitchen, food and utensils will have to be carried outside so you don’t want to be right down the bottom of the garden
Think about the prevailing wind direction, her in the UK the wind generally comes from the South or West so if chef is facing North East when cooking then there’s less chance that chef will have smoke blown back in their face.
Consider the sun, whilst it might seem a good idea to site your barbecue in a sun trap, chef might actually prefer shade in the height of Summer. That said, overhanging trees (and birds therein) will only drop debris onto the grill so an open yet shaded space is best.
Also make sure that your barbecue is going to be built away from anything that is flammable
3. Make Sure The Ground Is Level
If the foundation isn’t level, you will get ground movement over the years and this will cause the brickwork to crack and make your construction unstable.
If your site isn’t already level then it’s best to make a concrete base and to do this you need to dig down about 150mm (6 inches). Pour in a layer of gravel and then a concrete mix cement (mix to the manufacturer’s instructions and allow to set for the directed time. The perfectionists among you may want to create a slight slope on the concrete surface to facilitate drainage.
4. Soak Your Bricks
Whilst the concrete is drying, hose down your bricks with water 24 hours before you plan to use them. This will ensure that your bricks are holding water and therefore won’t draw moisture out of the mortar (causing it to crack) when you start construction.
5. Plan The Layout
Using your stainless steel charcoal base pan as a guide, lay out the first two layers of bricks dry (no mortar) around the base pan to get the barbecue sited correctly on the concrete pad. Try to do this by cutting a few bricks as possible remembering to leave a 10mm space between the bricks for the mortar and make sure that the corners are square. When you are happy with the positioning draw a line around the bricks to use as a guide when laying.
6. Lay The First Course
Prepare the mortar as per to manufacturer's directions (it should have a wet mud consistency) and lay out a generous layer of mortar along the outline of where the bricks will sit. Lay the first layer of bricks applying mortar one end of the next brick before butting it up to the previous brick.
Check that the first course is level, plumb and square, use your trowel handle to gently tap and reposition bricks as necessary.
7. Lay The Next Courses
Start building up at the corners and then filling in the walls as you did with the first course laying 12mm (½ inch) mortar onto the previous layer of bricks and on the brick ends as before. Place a metal tie into the mortar to join the side walls to the rear wall and remember to stagger the joints.
This means that the end bricks will on every other course have to be cut in half. Do this with a cold chisel or a masonry blade for your power saw if you have one. Score around the brick and then give a sharp blow on the scored line with the cold chisel and it should split.
Continue to check each course for level, plumb and square as before and scrape away any excess mortar.
Note: You will see some BBQ grills built this way that have bricks turned inwards to provide the support for the ash pan and height adjustment for the cooking grate. Whilst this will no doubt give you a high score on architecture and construction, it'll do nothing for your skills as a chef because the height adjustment interval for the cooking grate is just too big to give you the fine tuning over heat control that you need.
That's why I recommend using pins as set out in step 11
8. Pointing
Another word for making the mortar look a nice con-caved shape. Use the outside of a hose pipe to smooth the mortar before it gets too dry.
9. Finishing Off
Continue building up until you reach your preferred height, we find that 1200mm or 4ft is about the perfect height for resting your beer bottle when cooking. Top off the final layer with solid bricks (if you’ve used holed bricks further down) and lay them frog side down for a smooth level finish.
10. Let It Cure
You can build a brick BBQ grill in a day but curing will take a week. The mortar has to dry and harden so be patient. Use a wire brush to dust off any lumps of drying mortar.
11. Install Your Stainless Steel Grill Inserts
Plan what height is comfortable to cook at and set that as the height for your cooking grates. We will refer to this height as “normal” from hereon in the guide. In a standard kitchen this is set at 900mm (35½ inches) from the floor so use that as a guide. Drill holes to insert two stainless steel pins on each side to act as supports for your cooking grate.
Now you can set the height of the base pan below. We normally recommend that the base pan be set 150mm (6inches) below the level of the normal cooking grate.
You then have a further 8 pins to set another 2 levels of height adjustment for your cooking grate. We normally set one level 50mm (2 inches) above “normal” so you can cook gently over fresh coals or keep food warm when you sit down to eat. Set the other level at 50mm (2 inches) below “normal” to be used either when the coals are on their way out after a long cookout or in order to get an intense heat for grilling steaks.
Maintenance Of Stainless Steel Charcoal Grill Inserts
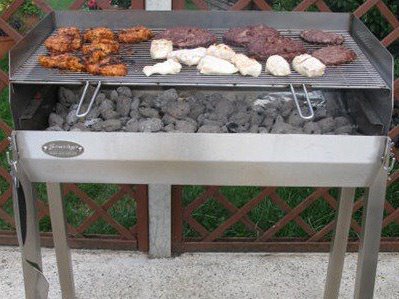
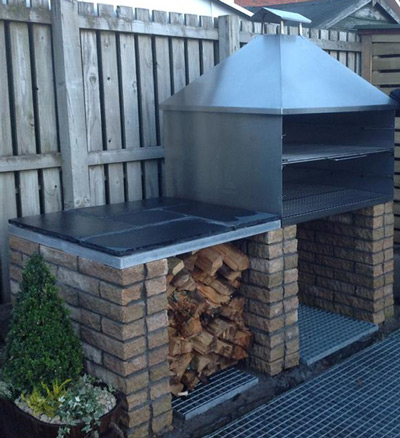 This stainless steel BBQ grill sits directly on your brickwork
If you've built a brick bbq using stainless steel grill inserts you should get years of pleasure. To keep then looking as good as the day you bought them you will need to give them a little "TLC" now and again. Click here to read our guide to cleaning stainless steel cooking grates and stainless steel surfaces in general.
For more information and custom quotations please complete the rapid response form below and Michael will get back to you within 48 hours.
Build A Brick BBQ Grill On The Cheap
When I was a student, money was in short supply so the student barbecue was made from 8 bricks (on long term loan from a local construction site) and a cake cooling tray.. simple but effective. Here's my story:
"Whether you’re a student, unemployed or just plain strapped for cash, this is the barbecue grill design that will allow you to continue to enjoy outdoor charcoal grilling.
Many moons ago I was a poor student in Manchester, England and even in those days I enjoyed outdoor cooking and entertaining. I lived with a group of students in Kedleston Avenue, Victoria Park, and even if I do say it myself, the “Kedleston Barbecues” became almost legendary. To be fair it was partly down to some pretty alcoholic marinades (and there’s nothing wrong with a splash of wine in any marinade) but in the main it was the simplistic grill made out of bricks and a cake cooling rack.
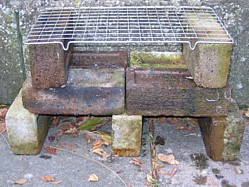 How to build a brick BBQ on the cheap!
Referring to the picture above, the charcoal is laid out on the flat layer of bricks. The cooking grate (the cake cooling tray) is supported by a brick at either end of the grill (if your charcoal is running hot them you might need two bricks) and the whole thing is built on a further base of bricks. This base is purely to give the grill some height so it's not such back breaking work to cook the food.
Don't be tempted to raise the height any further though because there's no mortar holding the bricks together so it will become unstable. This brick bbq grill is designed to be functional and nothing more.
You can see how simple it is to construct and the beauty of it is it’s modular design so if cooking for more people, just add another unit and you’ve got one long BBQ. You can even set the individual fires off at different times to ensure that there’s always gentle, medium and hot coals available – and all for the price of a few bricks and cake cooling trays.
To be truthful, there was one house on the street that was being knocked down so we had a free supply of bricks too!
Note:- I dropped a clanger when preparing this picture in that I've placed the bricks frog side up in the brick base where the charcoal sits. It doesn't alter the performance of the grill but placing them frog side down makes it easier to shovel up the ash after the cookout."
Build A Brick BBQ Grill Using A Sewing Machine Stand And A Car Jack
I then moved on…my father ran a sewing business and in “the old days” Singer made some really robust sewing machine stands. A steel plate was welded onto the top to create an ash pan so developed one of our more novel brick BBQ grill designs.
Now that I do things professionally, our designs get more elaborate but we still have fun!
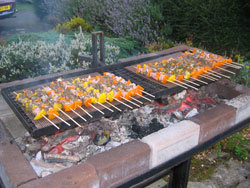 You can build a brick BBQ using a car jack and a sewing machine stand
For completion I've also researched
other related pages on the internet about how to build a brick bbq
grill. You may want to incorporate some of these ideas into your own
construction.
Build A Brick BBQ Grill Stations:-
Indistrucables.com - Go the whole hog and build a brick BBQ grill station that will really impress the neighbours.
Smokers:-
Homemade BBQ Smoker Plans - My very own design with easy to follow drawings designed for basic carpentry and no welding.
Build A Brick BBQ In A Shelter
And to finish I've got some interesting sites for your peripherals to help complete the outdoor kitchen.
BBQ Shelter - Plans for building the complete shelter, ideal for British weather!
See Also:-
Stainless Steel Charcoal Grills
Replacement Stainless Steel Cooking Grates
Barrel Smoker Plans

